Automatically add ICS files to Google Calendar

If your preferred email client is not one of the popular choices, for example you use roundcube, Nextcloud or Snappy mail, you probably have come across a situation where email invitations to web meetings arrive as email attachments. What’s then most convenient is to be able to click on an attachment and have it automatically appear in Google’s calendar. This guide explains how to achieve this on a Linux desktop, as well as in Android.

The attachment is a file with an ICS or iCal extension is a set of meeting’s metadata. It is formatted and known as one of the MIME type files. This allows desktops to assign a handling application whenever such file is to be opened. For Android, the operation is easy, since there’s a Google calendar app either preinstalled or easily installed, which can be associated with the file (use the tripple-dot button on the file, then “Open with” and select the calendar app).

The challenge is a bit harder on the desktop, where there’s no Google app available. There usually are, depending on the choice of the desktop manager, calendar applications which could integrate with Google’s calendar, however that is not always the case. In such situations, there’s a good solution called gcalcli.

It can be easily installed in user mode with a few trivial steps (such as creating a python virtual environment). Since the Google Calendar is available through a RESTful API behind OAuth authentication, there is one prerequisite described in this guide. Following it allows gcalcli to securely call Google Calendar’s API to create events using the import command.

Eventually all that’s left to do is to write an oneliner script which can be tied to the desktop’s ICS MIME type, which will then run gcalcli with the right arguments and parameters. Here’s an example:

patryk@ryba ~ % cat gcal-venv/bin/importer.sh 
#!/bin/zsh
#
/home/patryk/gcal-venv/bin/gcalcli import --calendar='Patryk Rz.' "${1}"

Don’t forget to make importer.sh executable with chmod.

I use XFCE as my desktop manager, therefore my ICS file association looks like this:

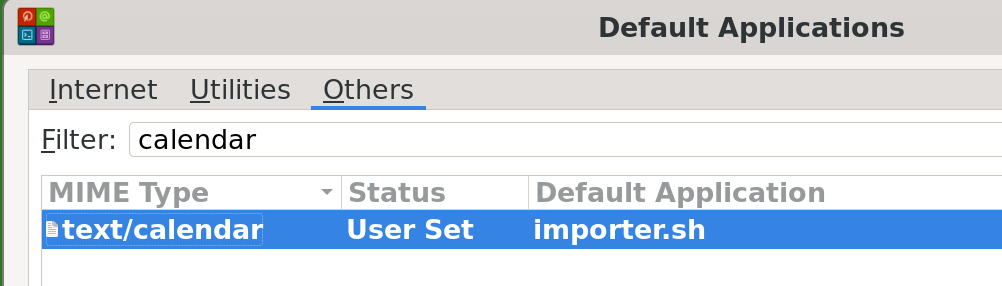
And that’s all. Clicking on any file with the .ics extension will have my desktop call the importer.sh script, which will invoke gcalcli from it’s venv with the right parameters. Gcalcli will then call Google’s API to create the event will all the details as the inviter intended. Enjoy.

Windows-like sound in a Linux desktop – or better!

While the sound architecture in Windows desktops is far from ideal, it’s still one of the most comfortable setups, at least from the user experience perspective. Most of the time it works and the default setup is suitable for vast majority of situations.

Meanwhile, ALSA in Linux has really made good progress. Most of the time, it does not require any configuration to deliver sound to desktop applications right after installing your favourite distribution. It almost levels with Windows from desktop experience perspective.

The difference comes when you want to do something even slightly unusual. On Windows it is very hard, users are down to finding some third party apps which might or might not do the job.

If you however run Linux and on its altar make an offering of your time and a prayer over the ALSA configuration, everything is possible. What’s more, Google’s search AI provides working examples (of course, bugged, but still somewhat useful), therefore within 1h I was able to get what I needed: sound simultaneously sent to multiple devices, adding a software volume where it is missing and mixing sound outputs.

In this article I will explain a configuration of 2 or more devices. Below are the 3 devices detected by ALSA on my desktop.

  • 1st sound device – an intel chip on the motherboard. This one could be connected to a set of speakers, for example. I’m not using it right now.
  • 2nd sound device – an audio chip onboard of my nVidia card, with a HDMI cable connected to my monitor, which has a built in speaker. Good whenever I want my ears to rest and get the sound from this speaker.
  • 3rd device – Fiio USB-bluetooth adapter. It presents itself as an USB audio device, and has a transceiver for bluetooth to communicate with my headset

In a Windows-like setup, you’d like to simply enable 2 or 3 devices and switch between them within a few mouse clicks. As it turns out in this setup, the Linux version requires one click less 😉 Also, I’ve decided to cut out all the overhead, so there’s no pulseaudio, JACK or any other extras, just plain ALSA with minimal configuration. Let’s begin.

First, kernel drivers are needed so that ALSA can recognize the sound devices. This step can be skipped unless you manage your own kernel config. In my case, the typical drivers are needed:

  • sound card support
  • snd-hda-intel for intel HDA and HDMI devices
  • CONFIG_SND_USB for any sound cards connected through USB, including some usb-bluetooth hubs like the Fiio.

The alsa-utils package provides a simple client to play audio files called aplay. It also allows listing sound devices, which is helpful to prepare the ALSA configuration. It will show devices here if the kernel drivers are compiled and loaded (if compiled as modules). For me it looks like this:

fst@ryba ~ % aplay -l
**** List of PLAYBACK Hardware Devices ****
card 0: PCH [HDA Intel PCH], device 0: Generic Analog [Generic Analog]
  Subdevices: 1/1
  Subdevice #0: subdevice #0
card 0: PCH [HDA Intel PCH], device 1: Generic Digital [Generic Digital]
  Subdevices: 1/1
  Subdevice #0: subdevice #0
card 1: NVidia [HDA NVidia], device 3: HDMI 0 [ROG PG27AQ]
  Subdevices: 1/1
  Subdevice #0: subdevice #0
card 1: NVidia [HDA NVidia], device 7: HDMI 1 [HDMI 1]
  Subdevices: 1/1
  Subdevice #0: subdevice #0
card 1: NVidia [HDA NVidia], device 8: HDMI 2 [HDMI 2]
  Subdevices: 1/1
  Subdevice #0: subdevice #0
card 1: NVidia [HDA NVidia], device 9: HDMI 3 [HDMI 3]
  Subdevices: 1/1
  Subdevice #0: subdevice #0
card 2: PRO [FiiO BTA30 PRO], device 0: USB Audio [USB Audio]
  Subdevices: 1/1
  Subdevice #0: subdevice #0

What’s worth noting from the above:

  • card 0 remains unused. You can use it by declaring slave devices under hw0,0 and hw0,1 for analog and digital respectively.
  • card 1 is the nVidia oncard sound chip connected to the speaker built into my monitor
  • card 2 is the USB device

And here’s the /etc/asound.conf config file. You can also declare your config locally. As per the documentation, changing the config does not require restarting the ALSA service. Only restart the sound client such as mplayer to observe the changes.

The key to understanding this config is “stacking”. ALSA by default will pick a device and it will work unless you tell it to work in a specific way. This way is building stacks, like:

  1. define a hardware device using type hw
  2. connect a sound mixer to this hw device using dmix (needed when you want to play back more than 1 thing at a time)
  3. optionally apply a software volume mixer using softvol
  4. combine output of dmix/softvol to multiple sound cards using multi
  5. point the default device to point 4
# A PCM to mix sound output and send it to the HDMI hardware device
# only required settings are used,
# period_size specifies the amount of bytes consumed per interrupt
# ipc_key is used to set an unique identifier of the device
pcm.dmixer_hdmi {
	type dmix
	ipc_key 2048
	slave {
		pcm "hw:1,3" 
		period_size 1024
	}
	bindings {
		0 0
		1 1
	}
}

# Per analogiam, mix and send output to the USB sound card
pcm.dmixer_fiio {
	type dmix
	ipc_key 4096
	slave {
		pcm "hw:2,0"
		period_size 1024
	}
	bindings {
		0 0
		1 1
	}
}

# HDMI comes with hardware control in the monitor.
# This software volume control is plugged on top of 
# dmix and allows applying a volume control to it.
pcm.hdmi_sv {
	type softvol
	slave.pcm dmixer_hdmi
	control.name hdmi_volume
	control.card 1
}

# finally a device to send the same sound as output 
# to the selected sound cards
pcm.all {
	type plug
	slave.pcm {
		type multi
		slaves {
			a { channels 2 pcm "dmixer_fiio" }
			b { channels 2 pcm "hdmi_sv" }
		}
		bindings {
			0 { slave a channel 0 }
			1 { slave a channel 1 }
			2 { slave b channel 0 }
			3 { slave b channel 1 }
		}
	}
	ttable [
		[ 1 0 1 0 ]
		[ 0 1 0 1 ]
	]
}

# Instruct ALSA to use the "all" PCM whenever an app on the desktop
# needs to provide sound, as a default device. The stack is
# default->all->plug->multi->(softvol)->dmix->hw
pcm.!default {
	type plug
	slave.pcm "all"
}

# some apps don't use the PCM interface, chosing CTL instead
# such as alsamixer. This allows opening the usb device by default
# the '!' char replaces default configuration with creating the
# one specified in this config
ctl.!default {
	type hw
	card 2
}

That’s all. Switching between the devices can be achieved simply using a mixer app, or alsamixer in the terminal. For XFCE, I use xfce-mixer, but there are mixers also for Gnome or KDE.